Rye and Buckwheat Seeded Bread with Walnuts
This quick, versatile bread recipe packs in a lot of flavor, nutrients, fiber, and healthy fats. Organic bread flour, buckwheat, rye, nuts, and seeds combine to make a tasty, texture-rich experience. Add dried cranberries or raisins for some sweetness if that strikes your fancy.
Source
https://breadtopia.com/rye-and-buckwheat-seeded-bread-with-walnuts/
#buckwheatseeded #seededbread #walnuts #add
#rss #feeds #linksharing #qwibbit
#buckwheatseeded
#seededbread
#walnuts
#add
#rss
BreadLab7d
How Long Does Bulk Fermentation Take? Sourdough Times by Temperature and Starter
Last updated: October 23, 2026.
The short version
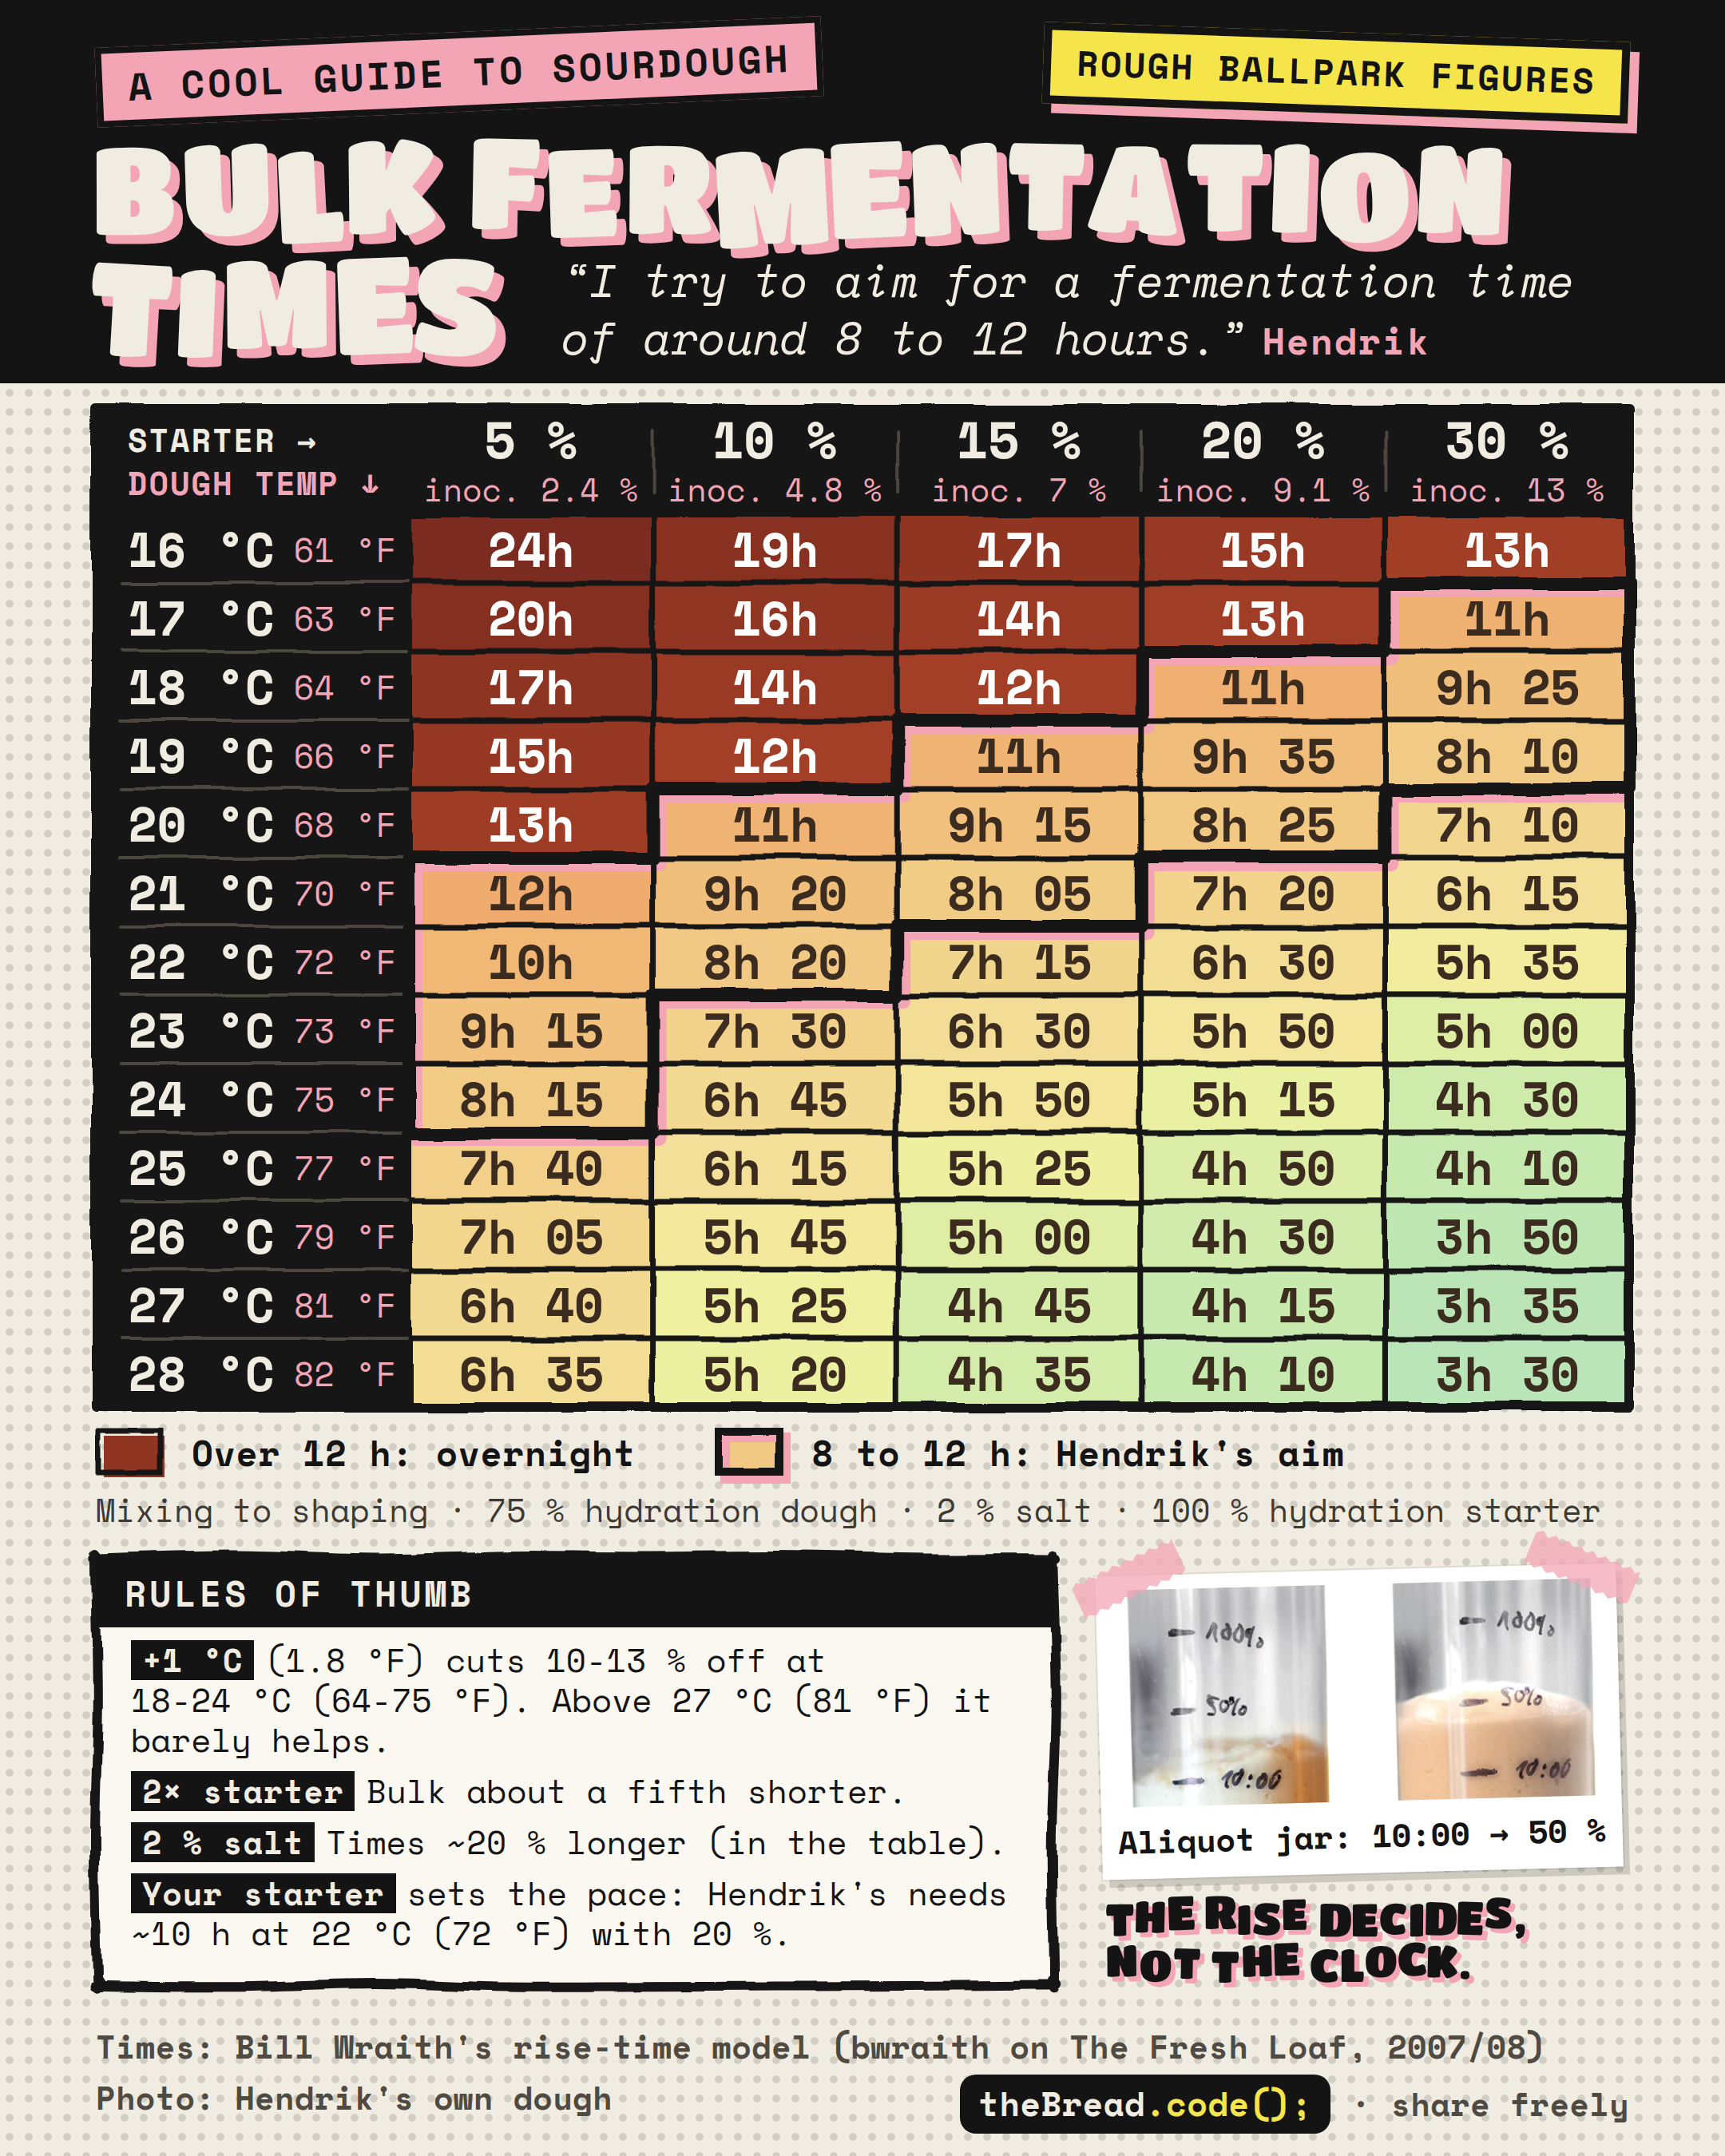
Rough ballpark figures. The times come from Bill Wraith’s rise-time model, made for his starter and his flour. Use them to plan your day, then let the dough decide.
Warmer is faster, up to a point. Between 18 and 24 °C (64 and 75 °F), every degree Celsius warmer saves about 10 to 13 % of the time. Above 27 °C (81 °F), more warmth barely helps.
Twice the starter cuts bulk by only about a fifth. Temperature is the stronger lever.
Salt slows it down. 2 % salt makes every time about 20 % longer than no salt.
Your starter sets the pace. At 22 °C (72 °F) with 20 % starter, my dough needs around 10 hours. The model says 6½.
The table
You are welcome to share it. A tag or a link back to this page is appreciated.
Tap the image for the full size version.
For every temperature and starter amount in between, use the
fermentation table and calculator. It converts other
starter hydrations, has a setting without salt for a levain, plans your day
from mixing to baking and can scale every time to your own starter.
In Loafy, my free sourdough app, the same estimate comes from three models:
Bill’s, the figures from my book and, with a free account, your own starter
from your bake journal. Open it in Loafy.
How to read it
Find your dough temperature. Measure the dough, not the room. A probe
thermometer in the dough is enough.
Go across to your starter amount, as a percentage of the flour weight,
for a starter at 100 % hydration. The small “inoc.” number under it is what
Bill’s model counts: the flour inside your starter as a share of all the
flour in the dough. 20 % starter is about 9 % inoculation.
Read the time. It is the bulk fermentation, from mixing until you
shape, for a dough with 75 % hydration and 2 % salt.
A dough at 24 °C (75 °F) with 10 % starter takes about 6 hours 45 minutes.
The light cells go up to about 12 hours. The dark red ones take longer: that
is overnight territory. The outlined cells are my aim. I try to aim for a
fermentation time of around 8 to 12 hours, which seems to be the sweet spot
for most of the flours I have worked with. The enzymes get enough time to
break down the flour.
Four rules of thumb
1. Warmer is faster, until about 27 °C
Between 18 and 24 °C (64 and 75 °F), every degree Celsius warmer saves about
10 to 13 % of the time. Below 18 °C it is about 15 % per degree, so a cold
kitchen slows your dough down a lot. A dough with 5 % starter needs about 13
hours at 20 °C (68 °F) and a little over 8 hours at 24 °C (75 °F).
Above 27 °C (81 °F), more warmth barely helps. With 5 % starter the model
gives 6 hours 40 minutes at 27 °C and 6 hours 35 minutes at 28 °C.
2. Twice the starter, about a fifth shorter
More starter brings more microorganisms into your dough, so it ferments
faster. But the effect is smaller than most bakers expect. Twice the starter
cuts bulk fermentation by only about a fifth, 16 to 25 % in the model. At
22 °C (72 °F), going from 10 to 20 % starter takes bulk fermentation from
8 hours 20 minutes to 6 hours 30 minutes. Two degrees warmer would do about
as much.
I use less starter than most bakers: around 5 % in summer and 10 to 20 % in
winter. The section
How much starter?
in my book explains why.
3. Salt slows everything down
The table is for a dough with 2 % salt. In Bill’s model, 2 % salt makes every
time about 20 % longer than no salt. That is one reason a levain ferments
faster than the bread dough you make from it. For times without salt, pick
“Levain or starter” in the calculator.
4. Your starter sets the pace
Bill tuned the model to his starter and a flour mix of about 85 % white flour,
10 % whole wheat and 5 % whole rye. Your starter can be much faster or slower.
Mine is slower: at around 22 °C (72 °F) in my kitchen, with about 20 % starter,
my bulk fermentation is ready after around 10 hours. Bill’s model says 6½.
Bill’s tip makes the table yours. Feed your starter, note when it has doubled
and compare that with the model. If your starter takes 30 % longer, add 30 %
to every time in the table. The calculator does this for you under “Make it
fit your starter”.
What the table doesn’t know
Every time in it is a rough ballpark figure. These are its known limits:
Bill’s starter, Bill’s flour. Your starter and your flour are different.
One kind of dough. 75 % hydration with mostly white flour. Whole grain,
very stiff or very wet doughs, and doughs with sugar, butter, milk or eggs
ferment differently.
One temperature from start to finish. Real kitchens warm up and cool
down. A cold proof in the fridge isn’t covered at all.
A limited range. 10 to 29.4 °C (50 to 85 °F), and 1 to about 66 %
starter (0.5 to 25 % inoculation).
Estimates in between. Bill’s table has 5 °F steps and eight starter
amounts. Everything in between is interpolated.
The full list is on the fermentation table page.
When is bulk fermentation done?
Not when the table says so. The table tells you when to start looking. My book
puts it plainly: “The worst thing you can do when fermenting sourdough is to
rely on a recipe’s timing suggestions.” That includes this table.
Judge the dough by its size. My go-to method is an aliquot jar: a small sample
of your dough in a straight-sided jar, marked at the start. When the sample has
grown by your target, the main dough has too. On the poster, my sample took 10
hours to grow by 50 %. How much it should grow depends on the protein in your
flour:
Flour protein
Size increase to aim for
8 to 10 %
25 %
10 to 12 %
50 %
12 to 15 %
100 %
more than 15 %
more than 100 %
For all the ways to tell, follow the
bulk fermentation chart
in my book. Do You Speak Dough?
translates seven things your dough tells you during bulk fermentation.
For the programmers: the Ruby edition
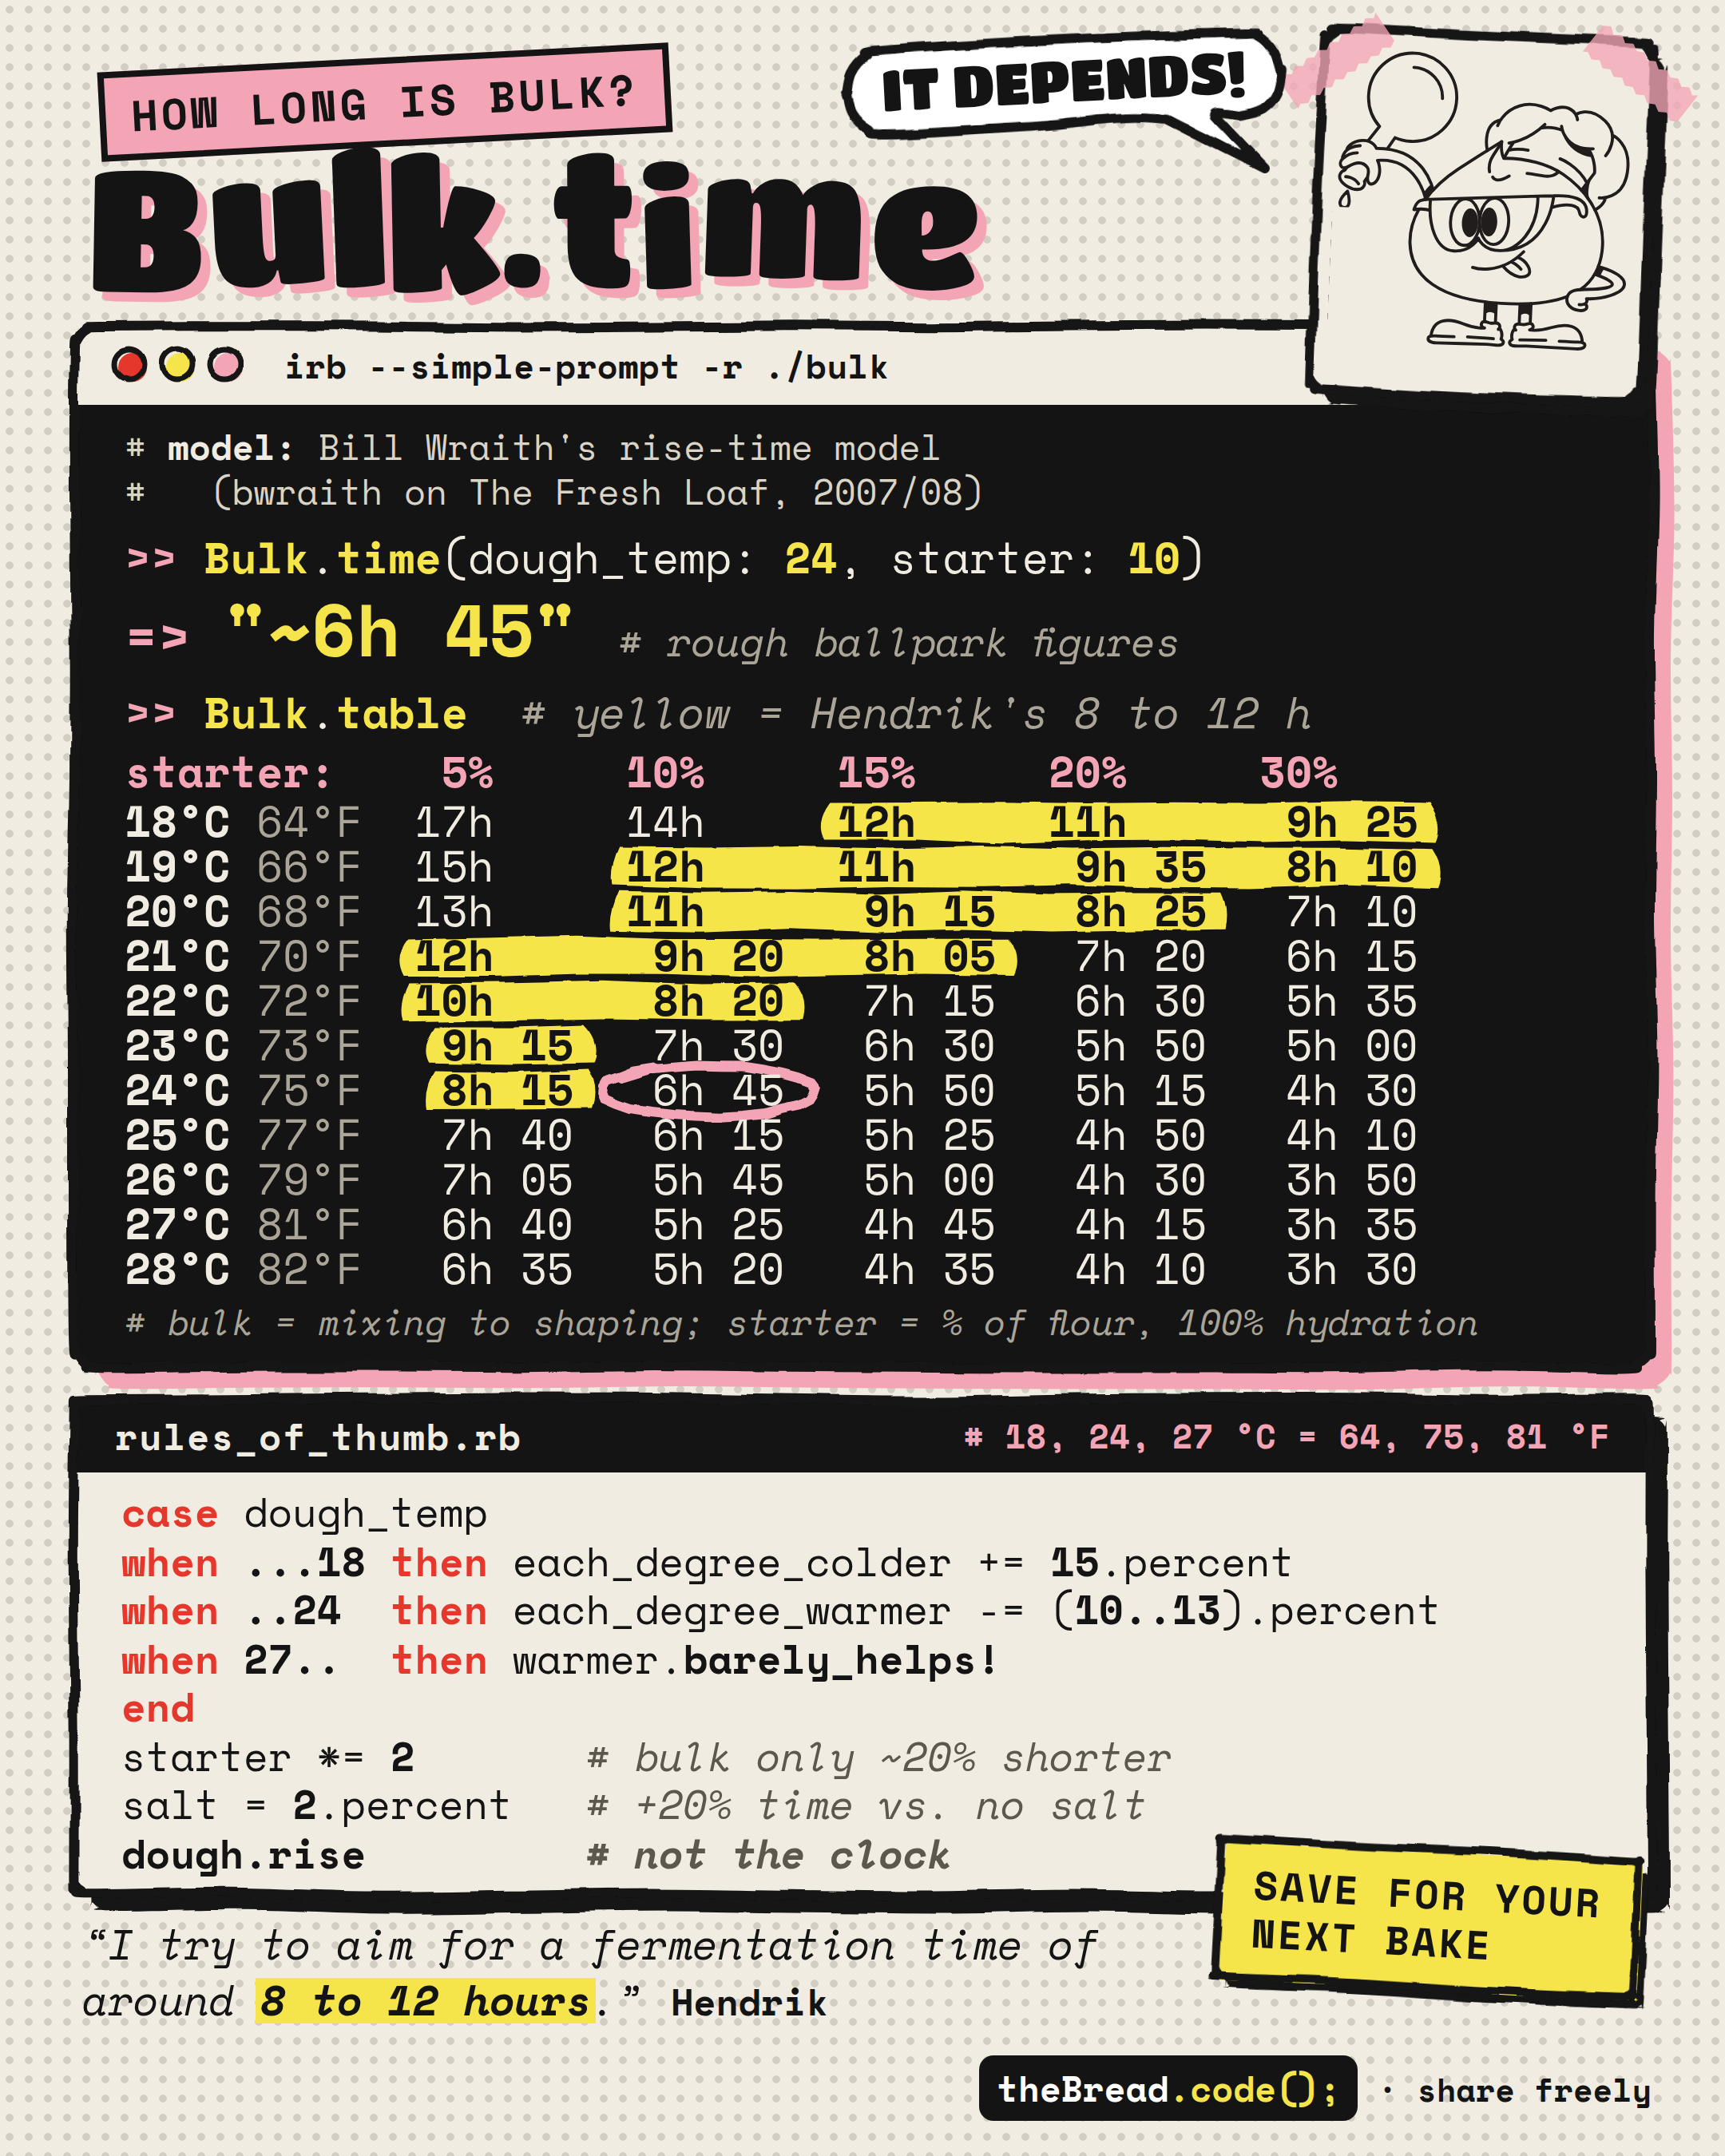
The same numbers as an irb session. The rules of thumb end where they should:
dough.rise # not the clock.
Credit where it belongs
The model and every number in the table are by Bill Wraith, known as bwraith
on The Fresh Loaf. He built it in 2007 and 2008 from his own test doughs,
scientific papers and baking books, and
shared it on The Fresh Loaf with the
words “Use it as is, and modify it as you like.” His website is no longer
reachable, so I keep
his original table,
unchanged, on this site. The colors, the calculator and the poster are my
easier way to read it. Thank you, Bill.
Your dough does something else?
If your dough doesn’t behave like the table, ask
Loafy, my free sourdough
assistant. It answers from The Sourdough Framework and names the chapter, and
when the book does not cover a question, it says so instead of guessing.
Sources
Bill Wraith (bwraith): Sourdough Rise Time Modelling and Recipe Calculators, The Fresh Loaf, 2007, and his original table.
My free book The Sourdough Framework, chapter 7, Wheat sourdough: How much starter?, Bulk fermentation, the bulk fermentation chart and how much the dough should grow.
Keep reading
The fermentation table and calculator: every temperature and starter amount, with proofing and a plan for your day.
Do You Speak Dough?: seven things your sourdough tells you during bulk fermentation.
The Sourdough Thermometer: what your dough does at 12 temperatures, from fridge to oven.
The Last Sourdough Bread Recipe You Ever Need: my recipe, step by step.
https://www.the-bread-code.io/tutorial/2026/10/23/bulk-fermentation-times.html
#starter #bulkfermentation #temperature #salt #bill #warmer #take #billwraith #loafy
#rss #feeds #linksharing #qwibbit
Twisted bread inspired by French Pain Gascon
This rustic bread, inspired by pain gascon from southeastern France, is delicious and an adventure to shape. The twist adds texture to the crust and extended time in the oven makes it extra crispy, crunchy, and toasty while keeping the crumb tender and moist for at least a week.
Source
https://breadtopia.com/twisted-bread-inspired-by-french-pain-gascon/
#frenchpain #paingascon #inspired #bread #france
#rss #feeds #linksharing #qwibbit
#frenchpain
#paingascon
#inspired
#bread
#france
BreadLab12d
Do You Speak Dough? 7 Things Your Sourdough Is Telling You During Bulk Fermentation
Last updated: October 19, 2026.
The short version
4 hours in, barely grew: not done. Recipe times come from someone else’s kitchen. Watch the dough, not the clock.
The test jar is up 50 %: a small sample in a straight jar grows with your dough. When it reaches your target, so has the dough.
Tiny bubbles on top: the dough is inflated with gas. Time to shape.
Smells like your starter: ready when it smells like a ripe starter just before it collapses.
Tacky, not sticky: ready. Overly sticky means it went too far.
Spreads, sticky, bubbles gone: too far, but not ruined. Bake it in a loaf pan.
Baked, gummy, big holes: not underproofed. The bulk fermentation was too short.
The phrasebook
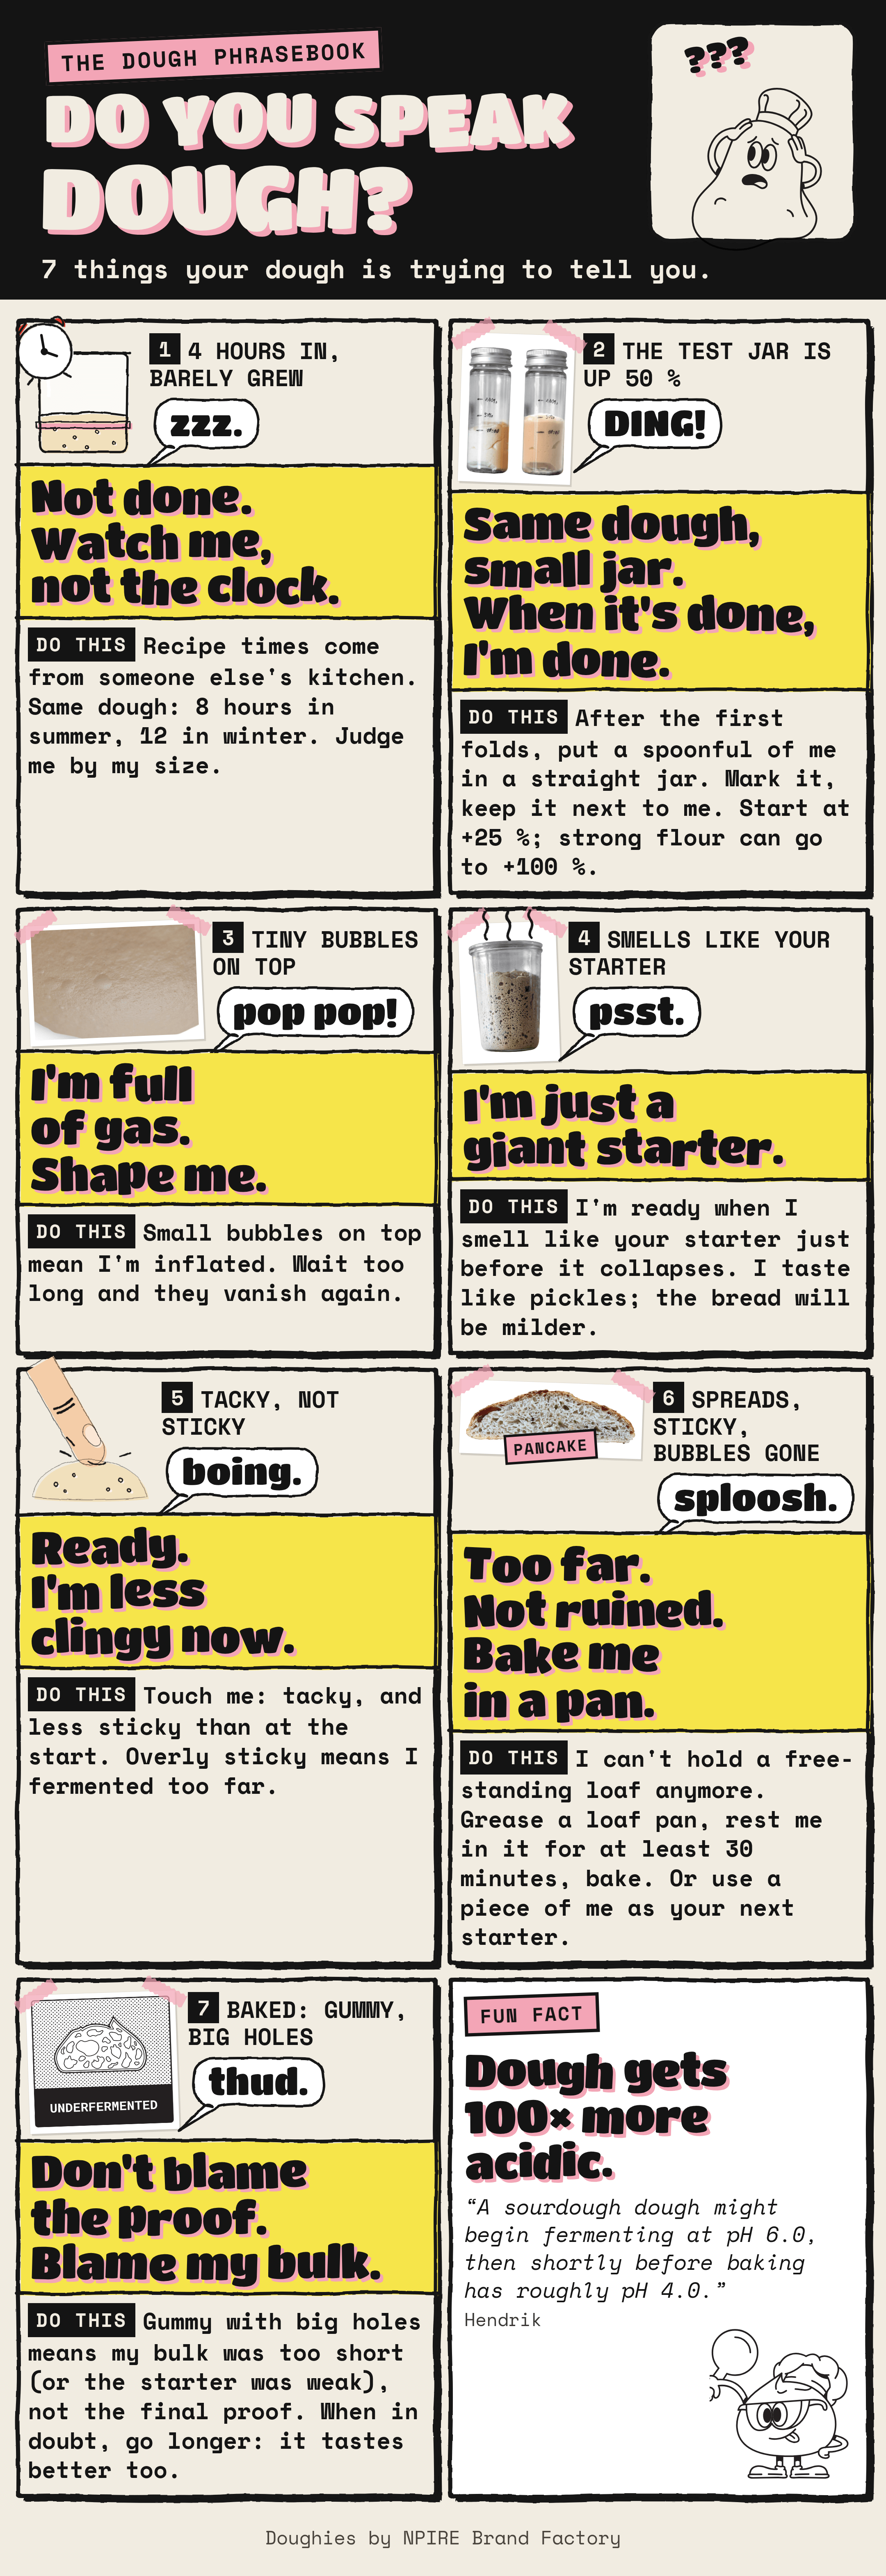
You are welcome to share it. A tag or a link back to this page is appreciated.
Tap the image for the full size version.
All seven at a glance
What you see
Your dough says
Translation
Do this
4 hours in, barely grew
zzz.
Not done. Watch me, not the clock.
Judge by size, not by the recipe’s time.
The test jar is up 50 %
DING!
Same dough, small jar. When it’s done, I’m done.
Shape when the sample hits your target.
Tiny bubbles on top
pop pop!
I’m full of gas. Shape me.
Shape before the bubbles vanish.
Smells like your starter
psst.
I’m just a giant starter.
Ready when it smells like a starter at its peak.
Tacky, not sticky
boing.
Ready. I’m less clingy now.
Overly sticky means too far.
Spreads, sticky, bubbles gone
sploosh.
Too far. Not ruined. Bake me in a pan.
Greased loaf pan, at least 30 minutes, bake.
Baked: gummy, big holes
thud.
Don’t blame the proof. Blame my bulk.
Next time, a longer bulk.
1. 4 hours in, barely grew: “Watch me, not the clock.”
The recipe said four hours. The four hours are over, and your dough looks
almost the same as when you mixed it.
The worst thing you can do when fermenting sourdough is to rely on a recipe’s
timing. In my experience it is wrong for you in almost every case. The writer
of the recipe has a different flour, a starter with a different level of
activity, and a kitchen with a different temperature. A small change in any
one of them changes the whole schedule, and one or two hours make the
difference between a dough that did not ferment long enough and a sticky,
fermented pancake. The same dough might be ready after 8 hours in summer and
easily need 12 hours in winter.
This is also one of the reasons bakeries prefer doughs with commercial yeast
only. Without the bacteria, fermentation is much more predictable and the room
for error is much larger.
Do this: treat the recipe’s time as a rough guide and judge the dough by
its size. A see-through container with a mark at the starting level, or the
test jar from the next card, tells you more than any clock.
2. The test jar is up 50 %: “When it’s done, I’m done.”
Experienced bakers judge the dough by look and feel. That works after
hundreds of loaves, not on your first ten. My go-to method for beginners is
an aliquot jar: a small sample of your dough that ferments along with the main
dough.
How to set it up:
Build the first dough strength, then take a spoonful of the dough.
Put it into a straight-sided, cylindrical jar and mark the level. In a jar
that gets wider at the top, you cannot judge the increase.
Keep the jar right next to your dough. Some bakers even put it into the
same container.
How much it should grow depends on your flour. A flour with more gluten can
ferment longer. Around 80 % of your wheat flour’s protein is gluten, so check
the protein on the package:
Flour protein
Size increase to aim for
8 to 10 %
25 %
10 to 12 %
50 %
12 to 15 %
100 %
more than 15 %
more than 100 %
The value is highly variable. I recommend starting at 25 % and testing up to
100 % over your next bakes, then keeping the value you are happy with.
Where the jar gets it wrong. The sample is small, so it reacts faster to
temperature than your dough. If you mix with warm water, the jar cools down
faster and lags behind. If you mix with cold water, it warms up faster and runs
ahead, and you stop too early. So use room-temperature water. The jar is also
less reliable when your kitchen’s temperature changes a lot during the day,
and for very large doughs of more than 10 kg of flour, which warm themselves
up while they ferment. If your dough rises and the jar does not, that
temperature difference is most likely the reason. Mark a see-through
container instead.
The photo on the poster is mine: it took 10 hours for that dough to reach a
50 % size increase.
3. Tiny bubbles on top: “Shape me.”
Small bubbles on the surface of your dough are a good sign. They tell you the
dough is inflated with gas. The further you push the bulk fermentation, the
more bubbles appear.
There is a limit. If you overdo it, the dough becomes leaky, and the bubbles
disappear again. That is card 6.
Do this: when you see small bubbles on top and the dough has reached its
size target, divide and pre-shape, or shape directly.
4. Smells like your starter: “I’m just a giant starter.”
Your dough is nothing but a gigantic starter: the same microbes doing the same
work, with more flour, water and salt around them. So it smells like one. At
the end of bulk fermentation it should smell like your ripe starter shortly
before it collapses.
You can also taste a little of the dough. It tastes like pickled food, and the
more acidic it is, the further the fermentation has gone. Don’t worry about
the sourness: the baked bread tastes milder than the raw dough, because some
of the acidity leaves the bread while it bakes. The longer you bake, the less
sour the loaf. The Sourdough Thermometer
explains what happens at which temperature.
Do this: smell your starter when it is at its peak and remember it. When
your dough smells the same, it is ready.
5. Tacky, not sticky: “I’m less clingy now.”
Touch your dough. At the end of bulk fermentation it should feel tacky on your
hands, and less sticky than in the earlier stages. If it turns overly sticky,
the fermentation has gone too far.
Part of the change comes from the dough strength you build: the more strength,
the less sticky the dough. And a dough with a lot of water always stays
stickier than a stiff one. So compare your dough with itself, not with a
photo, and read this sign together with the size and the bubbles.
Do this: touch the surface briefly. Tacky and ready to let go of your
fingers: shape. Clinging like glue after it already felt smooth: it went too
far, see the next card.
6. Spreads, sticky, bubbles gone: “Not ruined.”
The dough spreads in the bowl, the bubbles on top are gone, and it sticks to
everything. It fermented too long.
Here is what happened. Over time, an enzyme called protease breaks down the
gluten in your flour, and the bacteria consume gluten too. Bakers call it
gluten rot. The gluten that normally traps the CO2 can no longer
hold the gas, so it escapes. Baked free-standing, a dough like this flattens
in the oven into what bakers call a pancake, with many tiny holes instead of
an open crumb. That is the photo on the poster.
You won’t be able to bake a free-standing loaf with it anymore. But don’t
worry.
Do this:
Grease a loaf pan properly and move the dough into it. A spatula helps.
Let it proof in the pan for at least 30 minutes, so the big cavities from
the transfer even out. You can also push this proof to 24 or even 72 hours.
The bread then gets an excellent, very tangy taste.
Bake it.
Or use part of the dough as the starter for your next dough.
7. Baked: gummy, big holes: “Blame my bulk.”
You cut the loaf. The crumb is gummy, and there are large pockets of air,
often called craters. Many bakers would now call the loaf underproofed.
Underproofed is not a good term for it. It only refers to a short final proof,
the last rise before baking. Proofing makes the dough a bit more extensible
and lets it inflate a bit more. But if you bake a dough after a perfectly timed
bulk fermentation, it will not be underproofed even if you skip the final
proof entirely. A gummy crumb with craters means that something went wrong
earlier: the bulk fermentation was too short, or the starter was not strong
enough to begin with.
Do this: next time give the bulk fermentation more time, and judge it by
the signs above. When in doubt, go longer. I always push my dough more toward
a longer fermentation: the bread tastes better than a pale, underfermented one.
The crumb on the poster comes from my crumb chart. If your crumb looks
different, Debugging Your Sourdough Crumb
shows the other common crumb structures and their causes.
Fun fact: your dough gets 100 times more acidic
A sourdough dough might begin fermenting at pH 6.0 and reach roughly pH 4.0
shortly before baking. The pH scale is logarithmic, so every step is ten times
more acidic. Two steps make your dough 100 times more acidic than at the
start.
You can use a pH meter to follow the fermentation. It is the most reliable
method I know, once you have found the values that work for your starter,
water and flour. It is also the most expensive one, and the meter needs regular
calibration. For most home bakers the test jar does the job.
Your dough said something else?
The phrasebook covers the seven things bakers ask me about most during bulk
fermentation. If your dough is saying something that is not on the list, ask
Loafy, my free sourdough
assistant. It answers from The Sourdough Framework and names the chapter, and
when the book does not cover a question, it says so instead of guessing. If you
are baking your first loaf, the free
Bake Sourdough Bread
guide walks you through it step by step.
Sources
Every translation comes from my free book
The Sourdough Framework:
Chapter 7, Wheat sourdough: Bulk fermentation, the aliquot jar, the dough at the end of bulk fermentation and the dough’s pH during bread preparation.
Chapter 12, Troubleshooting: Debugging your crumb structure, Underfermented, Overfermented and My dough sample (aliquot) doesn’t rise.
Keep reading
Do You Speak Starter?: the starter phrasebook, seven things your jar is telling you.
Debugging Your Sourdough Crumb: what your crumb says about your bake.
The Sourdough Thermometer: what your dough does at 12 temperatures, from fridge to oven.
https://www.the-bread-code.io/tutorial/2026/10/19/do-you-speak-dough.html
#dough #bulkfermentation #sourdough #recipe #too #ready #smells #shape
#rss #feeds #linksharing #qwibbit
#dough
#bulkfermentation
#sourdough
#recipe
#too
BreadLab13d
Do You Speak Starter? 7 Things Your Sourdough Starter Is Telling You
Last updated: October 18, 2026.
The short version
Liquid on top: not dead. That is hooch, and it protects your starter from mold. Stir it back in and feed.
Big rise on day 3, then nothing: normal. The first rise came from the wrong microbes. Keep feeding every day.
Risen, bubbles on the glass: ready. Mix your dough now, before the starter collapses.
Collapsed, ring on the glass: you are late. Use half as much starter, or feed it again and wait for the next peak.
Smells like vinegar or acetone: acetic acid, nothing bad. A liquid starter makes it milder.
Rye barely rises: rye holds little gas. Judge it by bubbles and smell, not by height.
Stiff starter smells boozy: normal for a stiff starter. It favors the yeast.
The phrasebook
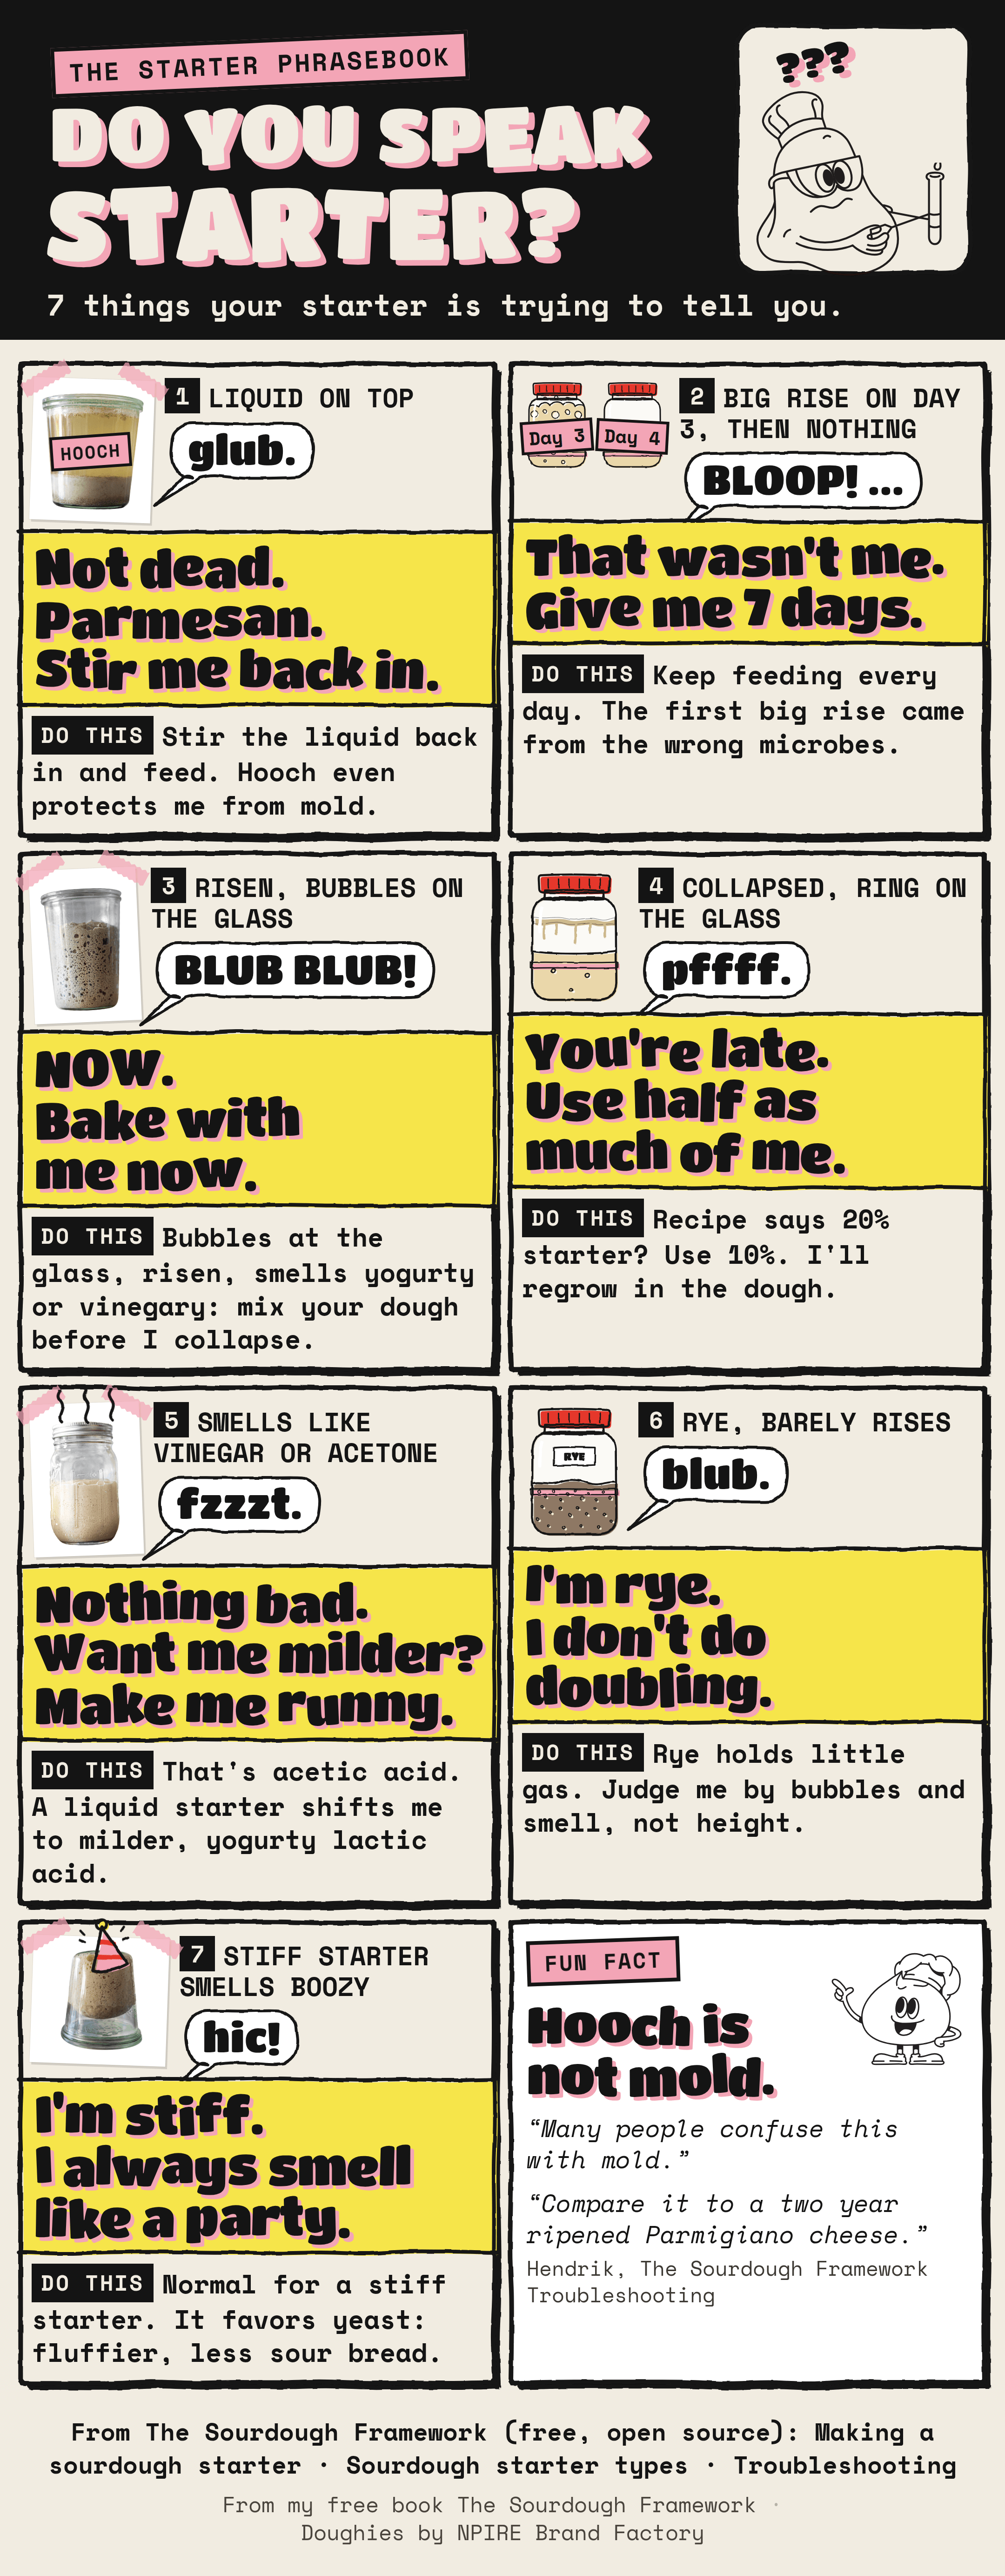
You are welcome to share it. A tag or a link back to this page is appreciated.
Tap the image for the full size version.
All seven at a glance
What you see
Your starter says
Translation
Do this
Dark liquid on top
glub.
Not dead. Parmesan. Stir me back in.
Stir the liquid in and feed.
Big rise on day 3, then nothing
BLOOP! …
That wasn’t me. Give me 7 days.
Keep feeding every day.
Risen, bubbles on the glass
BLUB BLUB!
NOW. Bake with me now.
Mix your dough before it collapses.
Collapsed, ring on the glass
pffff.
You’re late. Use half as much of me.
20 % starter in the recipe? Use 10 %.
Smells like vinegar or acetone
fzzzt.
Nothing bad. Want me milder? Make me runny.
Convert to a liquid starter for a milder smell.
Rye, barely rises
blub.
I’m rye. I don’t do doubling.
Judge by bubbles and smell.
Stiff starter smells boozy
hic!
I’m stiff. I always smell like a party.
Nothing. It favors the yeast.
1. Liquid on top: “Not dead. Parmesan.”
A liquid gathers on top of the jar, often grey or almost black, and it can
smell pungent. Many people confuse it with mold, and I have seen bakers
recommend throwing the starter away because of it. One baker told me they
threw out their first starter for exactly this reason.
The liquid is called hooch. When your starter has had nothing to eat for a
while, the heavier flour sinks to the bottom of the jar and the liquid stays
on top. It turns darker because light flour particles and dead microorganisms
float in it. Some bakers only call it hooch once it is dark, and call a clear
layer water separation. It is the same thing: flour at the bottom, liquid on
top.
The liquid is not a problem. It actually protects your starter from mold,
because mold needs air and cannot grow well under water.
Do this: stir the hooch back into your starter. Then take a little of it
and feed it to set up the starter for your next bread. If you prefer, you can
also pour the liquid off and use it. I have made lacto-fermented hot sauces
with it many times.
Why Parmesan? Hooch means your starter has fermented for a long time, so
it is probably very sour. In my book I compare it to a two year ripened
Parmigiano cheese: full of flavor. Don’t throw it away. A starter in this state
makes great discard crackers or discard bread.
2. Big rise on day 3, then nothing: “That wasn’t me.”
You mix flour and water, and two or three days later the jar foams up like
crazy. You are proud. The next day it is flat and quiet, and it stays that way.
Many people give up right here.
This is normal. Your flour carries countless wild microbes, and in the first
days all of them wake up and fight over the food. Some of the early winners,
mold among them, make the starter rise a lot. They are not the microbes you
want. With every feeding you select the ones that are best at fermenting
flour. They start out as a tiny population, so for a few days you see little,
even though there is activity on a microscopic level.
That is also why you discard the leftovers from the first days. Once you have
baked your first good bread, keep every bit of discard.
Do this: keep feeding once a day. In my experience a starter takes around
7 days. For some bakers it is ready after 4 days, for others it takes 20. If
nothing happens at all, check your water and flour first: chlorinated tap
water stops a starter, and a whole grain flour helps.
3. Risen, bubbles on the glass: “NOW.”
This is the moment you have been waiting for. The key sign is the bubbles
along the glass. The yeast produces CO2, the gas gets trapped in the
starter, and you see it at the edges of the container. Add to that the size
increase and the smell: a ripe starter smells sour, from yogurty to vinegary.
The bubbles, the rise and the smell together tell you more than any one of
them alone.
Do this: mix your dough before the starter collapses. Check it 6 to 12
hours after feeding.
How much should it rise? That depends on your flour and your microbes,
not only on how active the starter is. Watch your starter rise and then fall,
and remember the point just before it collapses. That is your peak, whether it
is 50 %, 100 % or 200 % more volume.
And the float test? I don’t use it. It only works when the flour can hold
the gas. A ready rye starter can sink, so the test says no when the answer is
yes.
4. Collapsed, ring on the glass: “You’re late.”
The starter rose while you were busy, then fell back. A dried ring on the
glass shows how high it got. This was the card that started the most
discussion, so here is the reasoning in full.
A starter that is past its peak has run out of food. The acid keeps piling up,
and the more acidic it gets, the more hostile it becomes to the yeast. The
balance shifts from the yeast to the bacteria. If you use the usual amount of
this starter, you bring all that acid and that balance into your dough, and
your bread comes out less fluffy and more sour than it could be.
You have two options:
Feed it again and use it at the next peak. This reliably makes the
better bread, and it is what I recommend.
Use less of it. If the recipe calls for 20 % starter, use 10 %. Your
starter regrows in the dough. Remember that the dough is just a big starter
with salt: with fresh flour and fewer old microbes, they have room to find a
good balance again.
Less starter means a slower bulk fermentation, so give the dough more time and
judge it by how it looks, not by the clock. I use option 2 when I fed my
starter in the morning and did not get to the dough in the evening. When a
starter has not been fed for a day, I go down to about 5 %, after two days to
about 1 %.
5. Smells like vinegar or acetone: “Nothing bad.”
Some starters smell like vinegar, some like glue or nail polish remover. Both
mean the same thing: your starter has produced a lot of acetic acid. When the
food runs out, some of your starter’s bacteria turn the alcohol from the yeast
into acetic acid, and they need oxygen to do that.
This is nothing bad. Acetic acid gives a strong, sharp flavor, which works
great in a hearty rye bread.
Do this: if you want a milder bread, convert your starter into a liquid
starter. The extra water keeps the oxygen out, and the lactic acid bacteria
take over. Lactic acid smells and tastes mild, more like yogurt. You cannot go
back once the acetic acid bacteria are gone, so keep a backup of your original
starter.
6. Rye, barely rises: “I don’t do doubling.”
Many recipes tell you to wait until the starter doubles. With rye, that can
mean waiting forever. Rye cannot build a gluten network, because sugars called
pentosans keep the gluten bonds from forming. So a rye starter holds only a
little of the gas its microbes produce, and it rises less than a wheat starter.
It can still be perfectly healthy and active. A wheat starter with weak flour
rises less for the same reason.
Several bakers told me their rye starter doubles anyway. That happens too:
how much a starter rises depends on the flour and on the microbes. The point is
that the height alone does not tell you whether your starter is ready. And in
case you wondered: this card is about rye. Whole wheat is still wheat and has
gluten.
Do this: judge a rye starter by the bubbles and the smell, and look for
the rise and fall pattern, not a number.
7. Stiff starter smells boozy: “I always smell like a party.”
A stiff starter has a hydration of 50 to 60 %, so for 100 g of flour you use
50 to 60 g of water. It feels like pasta dough. In the stiffer environment the
yeast thrives more: more CO2 and less acid. That is why a ripe stiff
starter smells mild and tends to smell much more alcoholic than a regular or a
liquid starter.
Do this: nothing, this is normal. Look for a dome and air pockets at the
sides of the jar to see that it is ready. Your doughs will be fluffier and less
sour. A lievito madre belongs to the same family, by the way. If yours smells
mild and not boozy, that is fine too.
If I had to choose one starter type, I would go for the stiff starter. You can
read why in Regular vs. Stiff vs. Liquid Sourdough Starter Explained.
Your starter said something else?
The phrasebook covers the seven things bakers ask me about most. If your jar is
saying something that is not on the list, ask
Loafy, my free sourdough
assistant. It answers from The Sourdough Framework and names the chapter, and
when the book does not cover a question, it says so instead of guessing. If
you are making your first starter right now, the free
Create Your Starter
guide walks you through it in about a week.
Sources
Every translation comes from my free book
The Sourdough Framework:
Chapter 3, Making a sourdough starter: The process of making a starter and Determining starter readiness.
Chapter 4, Sourdough starter types: Liquid starter and Stiff starter.
Chapter 7, Wheat sourdough: Readying your starter and How much starter?.
Chapter 12, Troubleshooting: My starter does not double in size, I made a starter, it rose on day 3 and now not anymore, Liquid on top of my starter and Why does my starter smell like vinegar or acetone?.
Keep reading
Sourdough Starter Peak: Should It Double or Triple?: what peak performance really tells you.
Fixing your moldy sourdough starter: when it really is mold, and how to rescue the starter.
The Sourdough Thermometer: what your dough does at 12 temperatures, from fridge to oven.
https://www.the-bread-code.io/tutorial/2026/10/18/do-you-speak-starter.html
#starter #liquid #nothing #hooch #stir #blub #stiff #use #rye #parmesan
#rss #feeds #linksharing #qwibbit
#starter
#liquid
#nothing
#hooch
#stir
BreadLab14d
Artisan Einkorn Yeast Bread
This delicious artisan einkorn yeast bread bakes up tall without any side support, maximizing the small amount of gluten strength in this ancient wheat with a few simple, effortless steps.
Source
https://breadtopia.com/artisan-einkorn-yeast-bread/
#einkornyeast #yeastbread #artisaneinkorn
#rss #feeds #linksharing #qwibbit
Mike G’s 8 Baking Tips for Better Sourdough
Mike G has been cooking and baking on the
internet for over a decade, and his channel
Life by Mike G has grown to more than
five million subscribers. If you have ever searched for a pizza dough or a
fermentation video, you have probably landed on one of his. So when he tells me
what actually made him good at bread, I listen.
Watch the full conversation on YouTube,
or read the short version below.
The through line of the whole conversation is one idea, and he says it in the
first minute:
Something kind of clicks in people and all of a sudden they have this freedom.
This sourdough starter which is so confusing when you start, now you kind of
get what is going on, and you do not need to be reliant on schedules or
recipes.
That is the same thing I wrote the free book
for. A recipe tells you what to do once. Understanding tells you what to do
every time.
Here are his 8 tips, with what I would add from my own baking.
1. Understand fermentation and gluten
Mike puts these two together on purpose. Fermentation gives you the gas, gluten
gives you the structure that holds it. Almost every bread problem is one of
those two being off.
Getting a baseline understanding of how bread fermentation works, also how
gluten works. Those two things in tandem make up a lot of the science of bread
making.
You do not need a food science degree for this. You need to know what a dough
looks like when the yeast has done its work, and what it feels like when the
gluten has. Once you have both, a recipe becomes a starting point instead of an
instruction you are afraid to deviate from.
2. Bake with a healthy, active starter
This is the one that quietly ends most people’s sourdough career. They build a
starter for a week, bake with it, get a flat loaf, and quit.
You have got to make sure there is a lot of activity. You are seeing those
bubbles, it is doubling or tripling in size. If you see an active sourdough
starter, that is going to be such a huge signifier of what your bread is going
to be.
Mike told a story I liked. He once baked with starter from a high end bakery in
Brooklyn that gets fed every single day, and the bread came out on another
level. Not because the starter was old or famous, but because it was fed
properly.
If yours is sluggish, the fix is usually the feeding, not the starter. I wrote
about the best starter feeding ratio
and about storing your starter
in detail.
3. Understand hydration, not just the number
Hydration is a percentage. The percentage lies to you if you change flour.
Every single flour is milled differently and it is a different grain. It is
grown differently, which means that it ultimately absorbs water at a different
rate.
So 75 percent hydration with one flour is a soft workable dough, and with
another it is soup. Mike’s conclusion is the one I keep coming back to: use the
number to get in the ballpark, then use your hands to land it.
4. Control your fermentation time
This is the tip I wish more people took seriously, because it is the one that
makes bread fit into a real life.
Pizza can be a one day process or it can be a three day process with the exact
same dough. It just depends on whether you want to slow ferment in your
refrigerator or you want it to be a one day thing.
Temperature and the fridge are your two dials. Warm speeds things up, cold slows
them down. Once you internalise that, you stop planning your weekend around a
dough and start planning the dough around your weekend.
5. Stop adding flour while you work the dough
You measured your hydration carefully. Then the dough sticks to your hands, you
panic, and you dust it with flour. Now you are baking a different dough.
At this stage when you are still forming the gluten, the dough is going to
suck up that flour and it is going to alter your hydration. So unless you are
accounting for that, you want to avoid adding a ton of flour.
His alternative is the one I use too. Wet hands and a bench scraper. Water on
your hands does not change the recipe, flour does.
6. Ferment in a container with volume markings
This is the cheapest upgrade on the list and probably the most useful one.
If you bulk ferment in a bowl and you are just guessing on the volume, a lot
of times you will under ferment or over ferment. Once I started using clear
containers with the actual volume markers, you can see exactly when it has
doubled.
A bowl hides what your dough is doing. A straight sided container with markings
shows it. If you do not want to buy anything, a rubber band around a jar does
the same job for free.
7. Upgrade your basic tools
Not a whole kitchen. A few things that remove guesswork.
These things really just increase your confidence and will get you that extra
5 to 10 percent on your final product.
A scale you trust, a bench scraper, a banneton, something heavy to bake in. My
own list is short for a reason. Most of the money people spend on bread gear
would be better spent on flour and repetition.
8. You will get better, and that is the whole point
The last tip is not a technique.
It took me years to feel very confident. Years and years. In the beginning
there were always things I did not quite understand and I was just guessing
and hoping.
And the line I want every beginner to read:
Even if you would say it is a bad bread, it still tastes much better than most
of the breads you can buy.
Your first loaves are supposed to be bad. Mine were. The difference between
someone who bakes good bread and someone who does not is almost never talent.
It is the number of loaves.
Watch the full conversation
The full interview runs about 32 minutes and covers a lot more than the tips,
including whether the age of a sourdough starter matters at all, mixing
sourdough starter with a pinch of commercial yeast, and why Mike thinks Taylor
Swift has probably watched one of his bread videos.
Watch it on YouTube
If you want to go deeper on any of the eight, the
free online book covers every one of
them with the science behind it. And if your bread is currently flat or dense,
start with debugging your crumb.
Thanks to Mike for taking the time. You can find him at
Life by Mike G on YouTube.
https://www.the-bread-code.io/tutorial/2026/08/21/mike-g-8-baking-tips.html
BreadLab16d
The Best Sourdough Books in 2026, Compared Honestly
Last updated: September 17, 2026. I revisit this list once a year.
Disclosure: I wrote the book at number one. It is free to read, so you can check my claim without spending a cent, and I say below where each other book is the better buy.
How I compared them
I read every book on this list cover to cover and baked from each of them.
I judged four things:
Does it explain why? Can you fix a failed loaf after reading it, or only repeat the recipe and hope?
Does it work in a normal kitchen? With supermarket flour, a home oven and a job that gets in the way of feeding schedules.
How much do you need to know first? Some books assume nothing. Some assume you already bake.
What do you get for the money? Two of these books are free or nearly so. That matters for a hobby you might not stick with.
Here is the list, in the order I would read them if I were starting again.
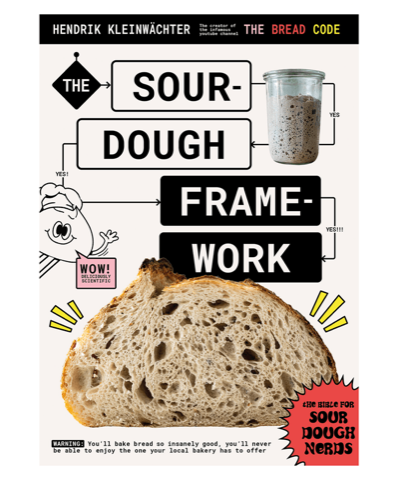
1. The Sourdough Framework, Hendrik Kleinwächter (2022, free, hardcover 2023)
Best for: understanding why your bread turned out the way it did.
This is my book, so discount my enthusiasm. Here is the case for it anyway.
It is not a recipe collection. It walks through the variables that every
recipe silently assumes: what your flour can absorb, how temperature drives
fermentation, what a strong starter looks like, when bulk fermentation is
done, how to read a crumb and trace a problem back to one decision. It is
built around flowcharts and tables because I am an engineer and that is how
I think. Ars Technica called it “a sourdough baking framework” hosted on
GitHub, which is accurate: the whole book is
open source,
free to read online, and
available in nine languages.
Weakness: it has few recipes and no glossy photography. If you want
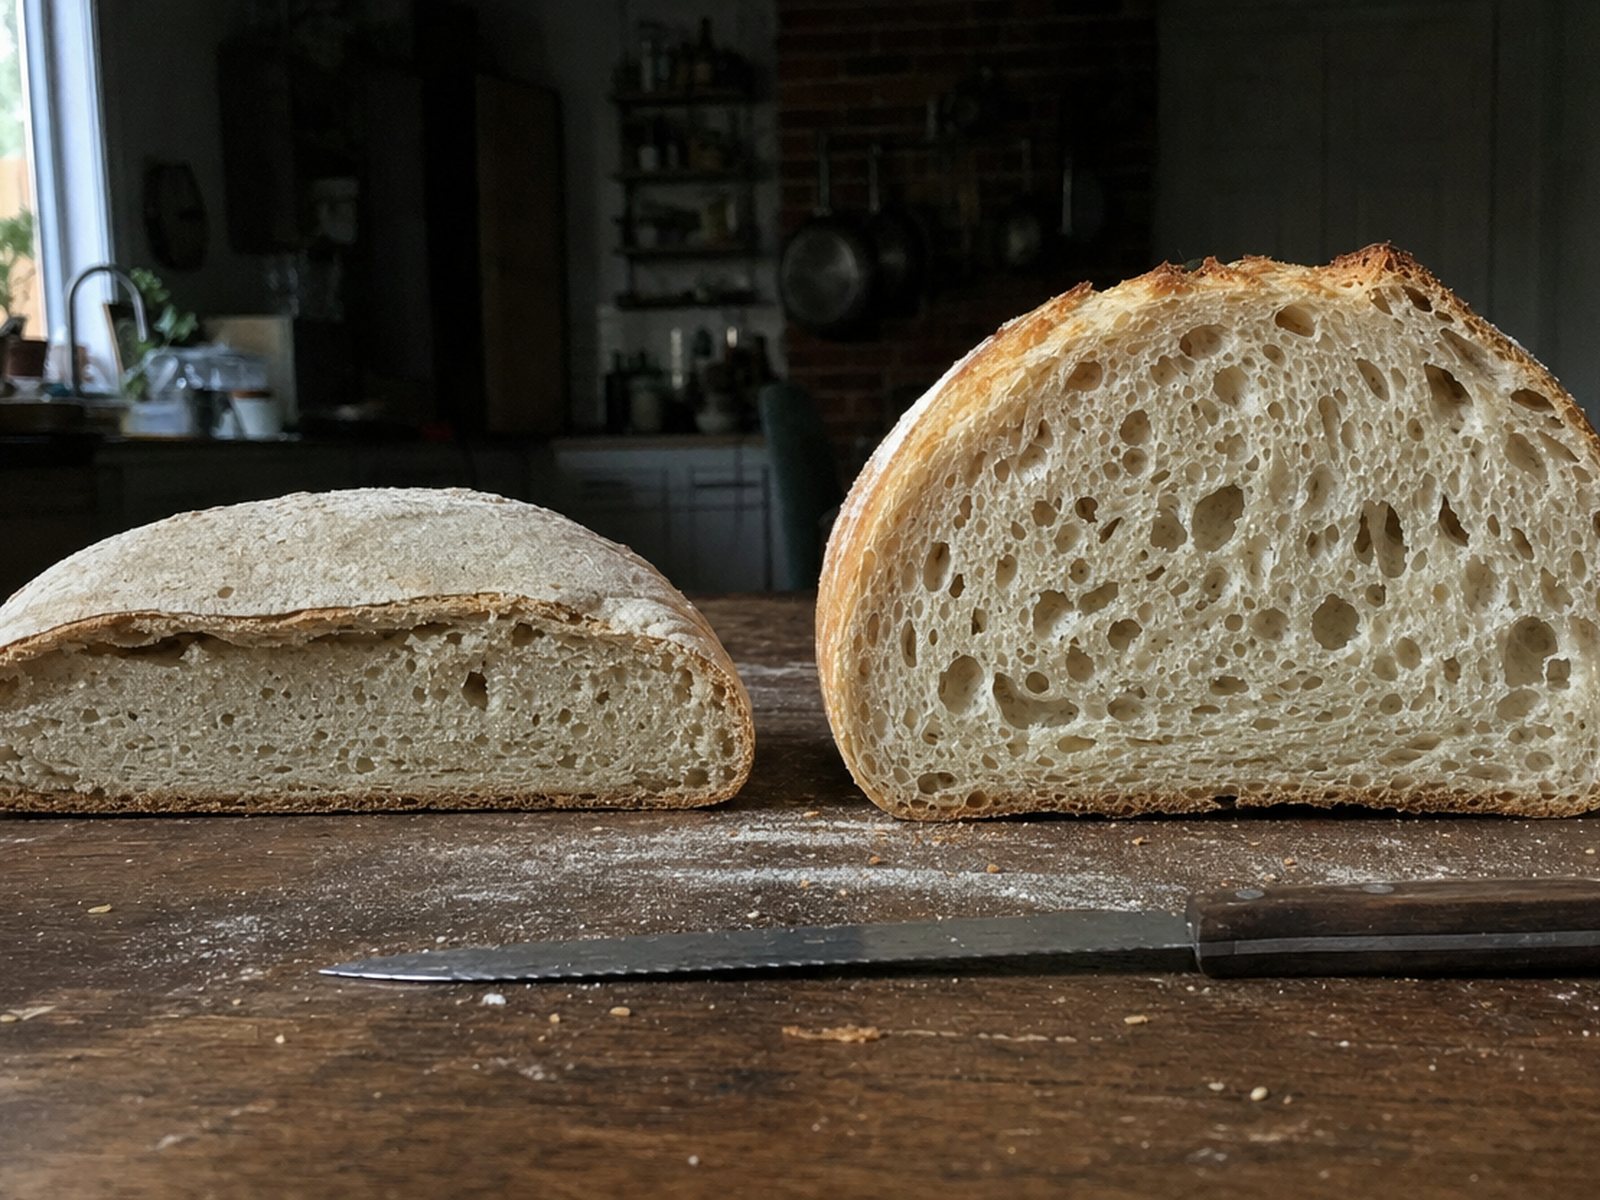
thirty breads to bake through, buy The Perfect Loaf as well.
Price: free online, or a 250-page
hardcover (ISBN 978-3-00-077702-8) for the kitchen
counter. Rated 5.0 by 110 readers on my shop.
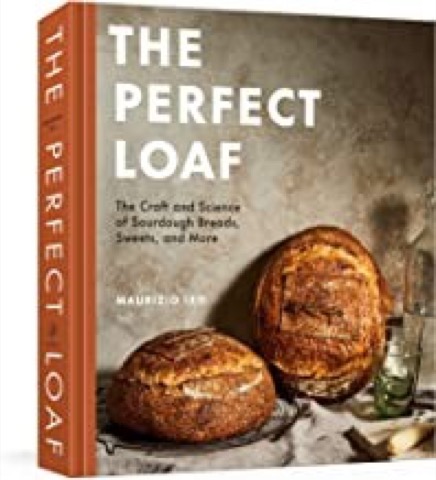
2. The Perfect Loaf, Maurizio Leo (2022)
Best for: the one book to buy if you want recipes and technique together.
Maurizio is, like me, a software engineer who fell into bread, and it shows
in the best way. The book is long (432 pages), methodical and photographed
step by step. Starter care, timelines, hydration, shaping and scoring are
all explained properly, and then there are dozens of recipes that actually
work. It won the 2023 James Beard Award for baking. If a friend asks for
one physical sourdough book and does not want to read mine first, this is
what I tell them to buy.
Weakness: it is a big book with long timelines, and it can feel like a
lot for a first loaf. The explanations sit inside recipes rather than being
organised as a system, so troubleshooting means flipping back and forth.
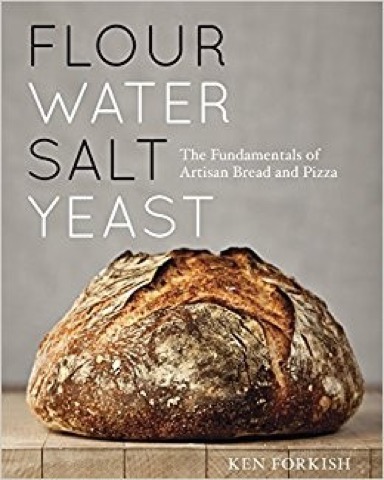
3. Flour Water Salt Yeast, Ken Forkish (2012)
Best for: repeatable schedules and learning baker’s percentages.
The classic that taught a generation of home bakers to think in
percentages and to respect time and temperature. The chapters on
fermentation and dough handling are still excellent, and the bread
schedules are precise enough to follow on a work day. It won the 2013
James Beard Award. About half the book covers yeasted breads, which is
either a bonus or a distraction depending on why you are here.
Weakness: the recipes make a lot of dough and lean on a Dutch oven, and
the sourdough chapters assume you already have a strong starter. The
science is practical rather than explained.
4. Tartine Bread, Chad Robertson (2010)
Best for: the open, blistered country loaf and developing intuition.
This book started the modern home sourdough movement. The country loaf
method, the long folding chapter and the photography still hold up.
Robertson teaches you to watch the dough rather than the clock, which is
the right instinct.
Weakness: it is the least beginner-friendly book on this list. The
instructions are narrative, hydration is high, and there is almost no
troubleshooting. Many readers bake flat loaves from it for months before
something clicks. Read it after you understand fermentation, not before.
5. Artisan Sourdough Made Simple, Emilie Raffa (2017)
Best for: a first loaf this weekend with minimal theory.
Emilie’s book is the gentlest entry on the list. Overnight bulk
fermentation, one bowl, a master recipe and then variations, plus a good
chapter on using discard. It removes the fear.
Weakness: because it keeps theory to a minimum, it does not tell you
what to change when the master recipe fails in your kitchen. Pair it with
a book that explains the variables and you have a complete set.
6. Sourdough by Science, Karyn Lynn Newman (2022)
Best for: the biology and chemistry, explained by a scientist.
Newman is a PhD scientist and the book reads like a well-run lab notebook
with photographs of what each stage should look like. The explanations of
microbiology and gluten are among the clearest in print.
Weakness: the recipe section is smaller and the method is more rigid
than the science would suggest. It is a great second book, not a first.
7. Bread Science, Emily Buehler (2006, updated 2021)
Best for: readers who want the chemistry, not a cookbook.
A compact tour of what happens in dough, from enzyme activity to gluten
networks to crust formation, written by a chemist who baked professionally.
It is the book I reach for when I want to check a claim.
Weakness: it is not sourdough specific, it has aged in places, and there
are almost no recipes. Buy it to understand, not to bake from.
8. The Sourdough School, Vanessa Kimbell (2018)
Best for: nutrition, digestion and whole grains.
Kimbell approaches sourdough from the health side: long fermentation, gut
health, stoneground flours and botanical blends. It is beautifully produced
and fills a gap the technique books ignore.
Weakness: the technique coverage is thinner and the health framing is
sometimes stronger than the evidence. If your goal is a reliable loaf, one
of the books above will get you there faster.
Also worth knowing
If you learn better by watching, I keep a separate list of
the sourdough YouTube channels I recommend,
grouped by what each one is good at.
Jeffrey Hamelman’s Bread is the professional reference and worth owning
once you bake regularly. Modernist Bread is five volumes of research at a
price that puts it in a different category. Both go deeper than anything
here, and neither is where I would start.
My recommendation
Complete beginner who wants a loaf this weekend: Artisan Sourdough Made Simple.
You want to understand what is happening in the dough: The Sourdough Framework (free), then The Perfect Loaf for recipes.
You like precise schedules and percentages: Flour Water Salt Yeast.
You are chasing the bakery-style open crumb: Tartine Bread, once you can read fermentation.
You want the science in depth: Sourdough by Science, then Bread Science.
If you only take one thing from this page: read the free book first, because
it costs nothing, and then buy the book that matches the bread you want to
make. Your loaves will tell you when you have understood enough.
Cover images via Open Library, used to identify each book.
https://www.the-bread-code.io/tutorial/2026/09/17/best-sourdough-books-compared.html
BreadLab16d
The Sourdough YouTube Channels I Actually Recommend
Last updated: September 17, 2026. I revisit this list once a year.
How to use this list
No channel teaches everything. Some are best for your first loaf, some for
understanding fermentation, some for watching a professional’s hands. I have
grouped them by what they are good at, and I say which ones to skip until
you are past the beginner stage.
Two rules that apply to every channel here. First, watch one full method
video before you bake, not ten. Ten methods at once is how people end up
with a runny starter and no idea why. Second, pair the videos with something
that explains the variables. That is what
The Sourdough Framework is for,
and it is free. If you want a printed book instead, my
comparison of sourdough books
covers eight of them.
Best for your first loaf
Bake with Jack, Jack Sturgess.
A former professional baker who films in a normal kitchen with normal
equipment. His sourdough series takes you from starter to loaf without
jargon, and his shaping videos are the clearest I know. Start here if you
have never baked bread.
Grant Bakes. Short, direct, and
honest about what goes wrong. Good troubleshooting videos for the first
few bakes, when most problems are the same three problems.
The Perfect Loaf, Maurizio
Leo. Recipe-led videos with the timeline on screen, the same calm approach
as his book. The best channel if you like following a full recipe and
want it to work the first time.
Best for understanding why
Foodgeek, Sune Trudslev. Sune bakes
the same loaf two or three ways and changes one thing: hydration, flour,
starter ratio, cold proof or not. Then he cuts them open. This is the
closest thing on YouTube to a lab, and it is how I think about baking too.
The Sourdough Journey,
Tom Cucuzza. Long, methodical deep dives. His videos on bulk fermentation
and on reading the dough are the ones I recommend when someone’s loaves
are dense and they do not know why. Not for a first bake, perfect for a
tenth.
ChainBaker, Charlie. Covers
yeasted breads as much as sourdough, which is a feature: you learn the
fundamentals of gluten, fermentation and temperature that apply to both.
Very good on the difference between what a recipe says and what a dough
does.
Best for technique and hands
Culinary Exploration,
Philip. Clean technique videos with a good eye for shaping, scoring and
crust. Watch his shaping videos slowly, then copy the hand positions.
Full Proof Baking, Kristen
Dennis. If you are chasing the very open, high-hydration crumb, this is
where to learn the patient handling it needs. Do not start here; the
doughs are demanding.
Proof Bread. A real bakery in
Arizona filming its production, mistakes included. Not a tutorial channel,
but watching hundreds of loaves shaped in a row will fix your shaping
faster than any tutorial.
Broader channels worth knowing
Life by Mike G, Mike G. A
cooking channel with more than five million subscribers, and excellent on
fermentation and pizza dough fundamentals. I sat down with him for
his eight baking tips,
and most of them were about understanding the dough, not the recipe.
King Arthur Baking.
The flour company’s channel. Reliable, conservative technique videos and a
very large back catalog. Good for specific questions like “how do I shape
a batard” when you want a plain, correct answer.
And mine
The Bread Code. I test one
variable at a time, show the failures, and collect what holds up in
The Sourdough Framework, which
is free to read. If the channels above show you what to do, my aim is to
explain why it works, so you can adapt it to your own flour and oven.
If you only watch three
Never baked bread: Bake with Jack, then The Perfect Loaf.
Baked a few, loaves are dense or flat: The Sourdough Journey, then Foodgeek.
Want the open crumb: Full Proof Baking, with Culinary Exploration for shaping.
Whichever you pick, bake the same recipe three times before changing
channels. Your loaves will tell you more than the next video will.
https://www.the-bread-code.io/tutorial/2026/09/17/best-sourdough-youtube-channels.html
BreadLab16d
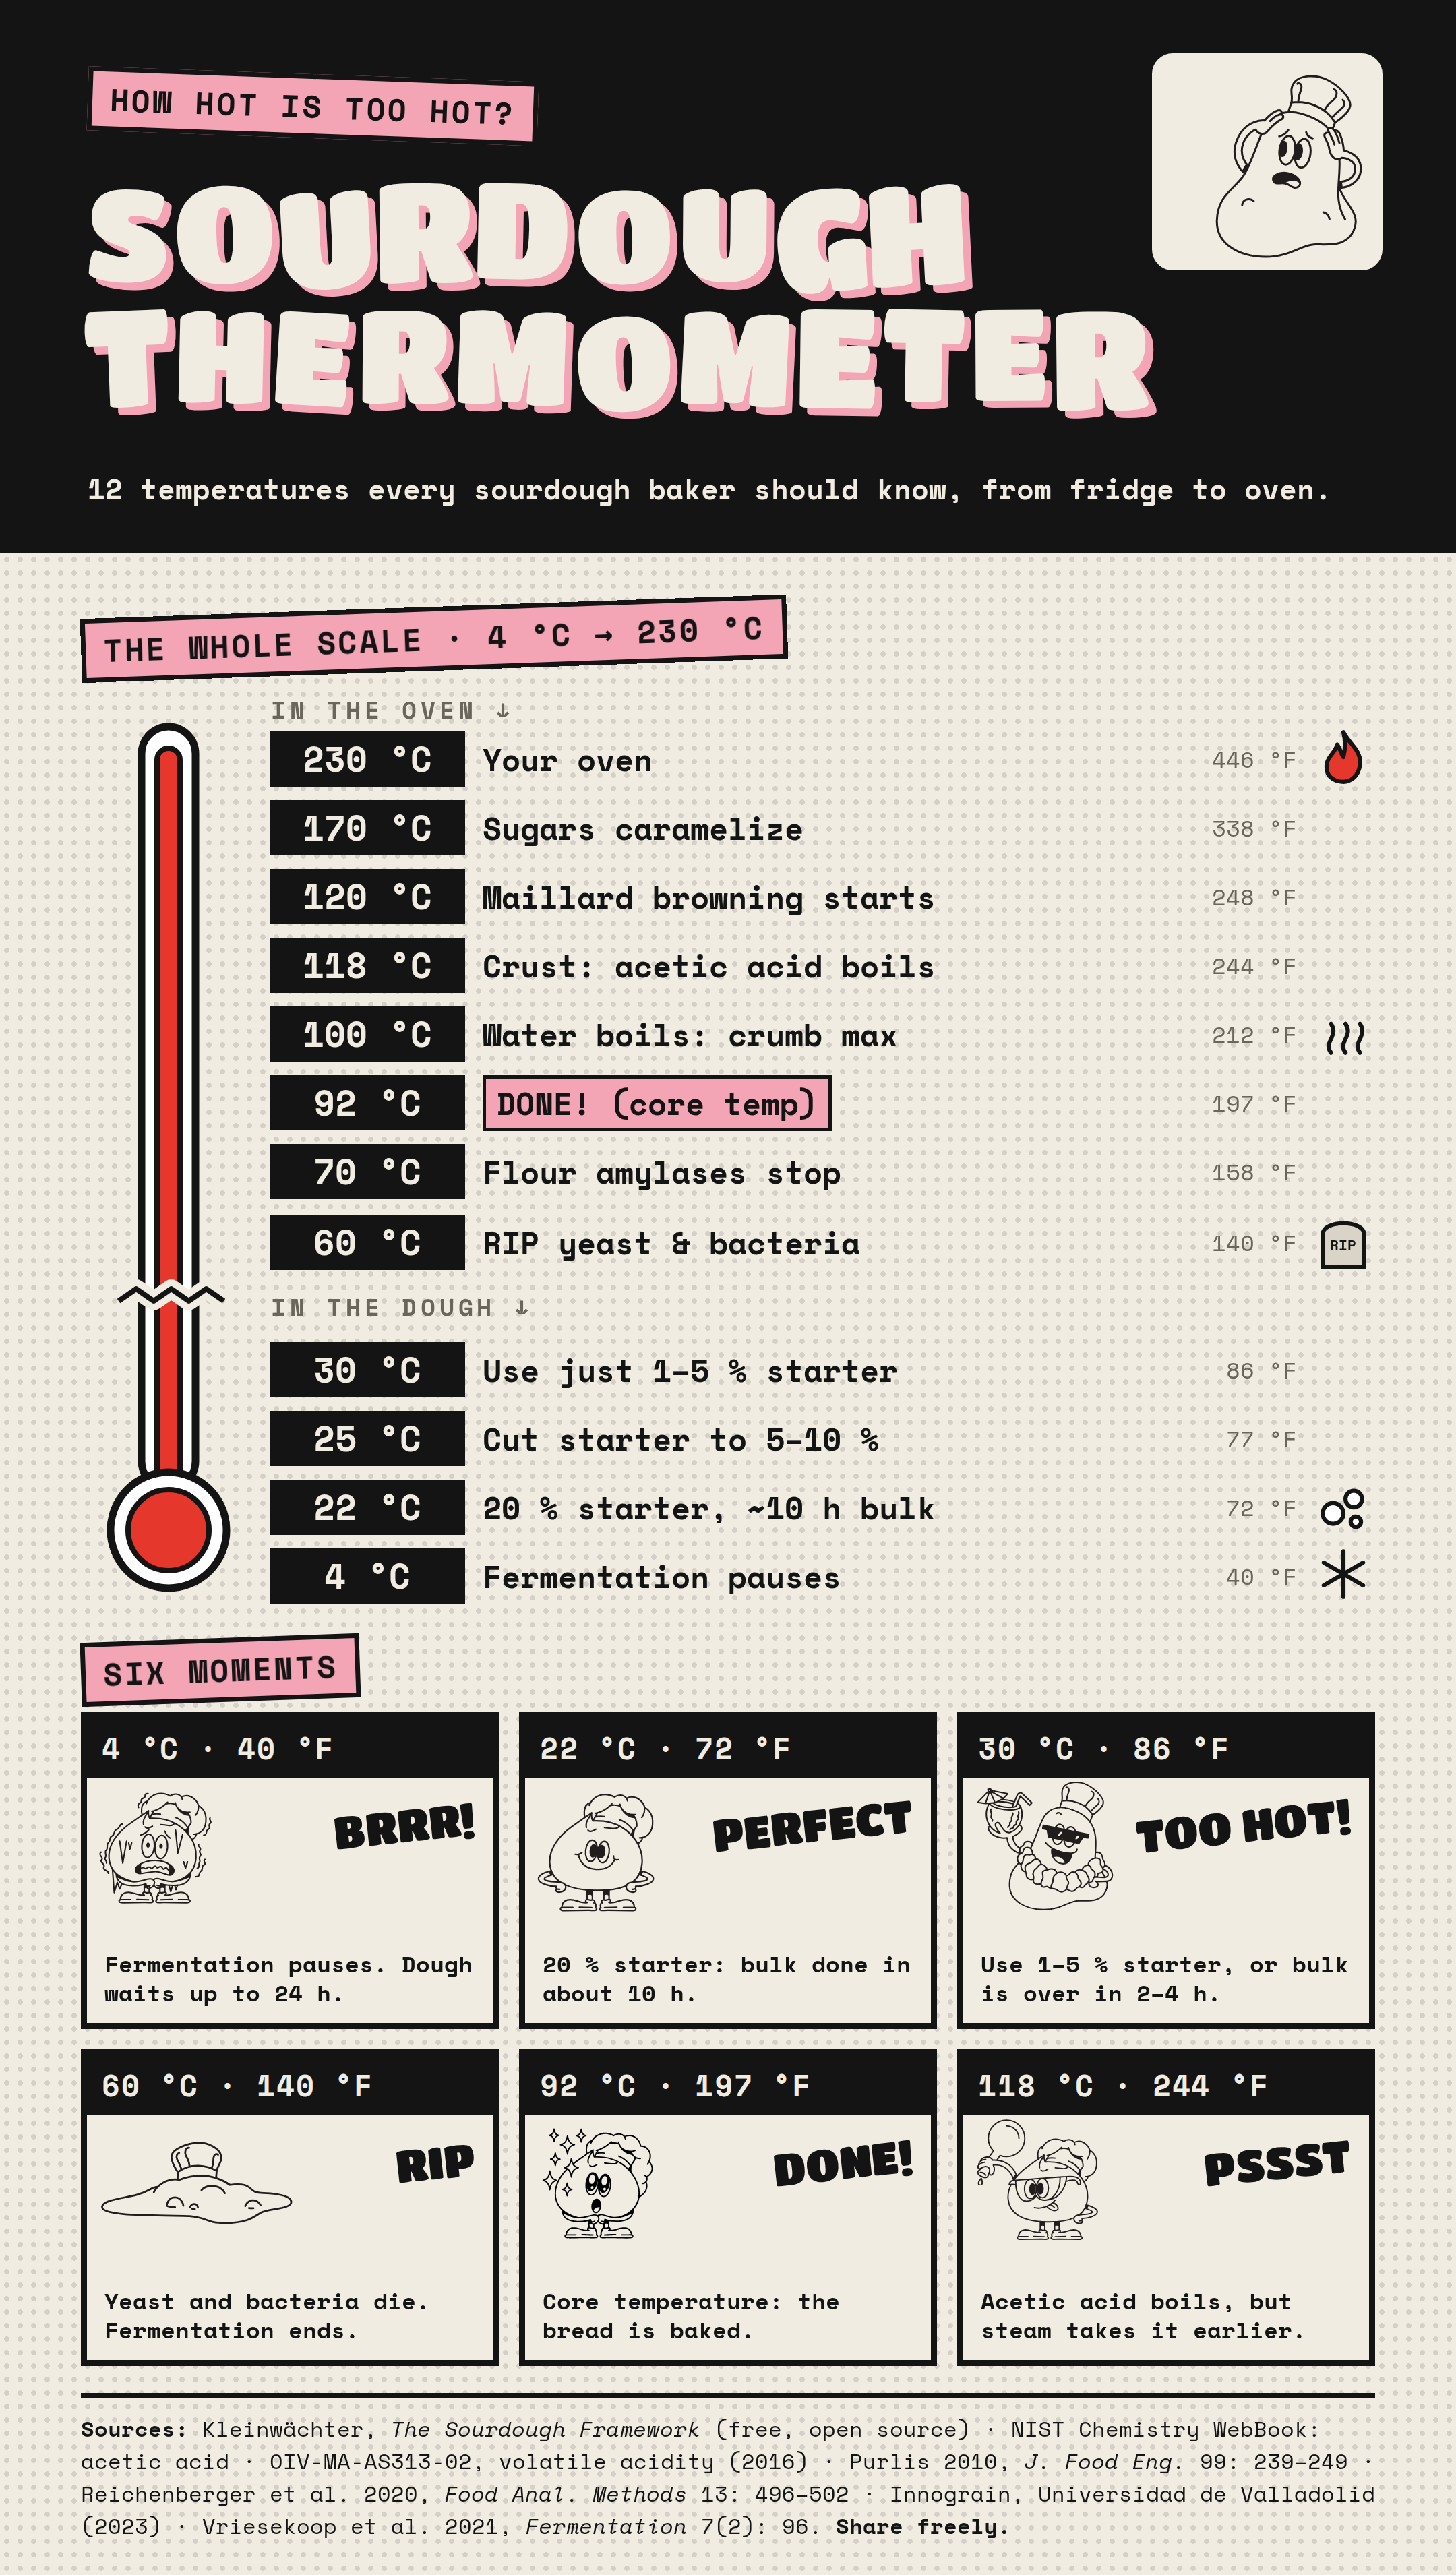
The Sourdough Thermometer: 12 Temperatures for Bakers
Last updated: October 9, 2026.
The short version
4 °C (40 °F): fermentation pauses. Your dough can wait in the fridge for up to 24 hours.
22 to 30 °C (72 to 86 °F): the warmer your kitchen, the less starter you need. About 20 % at 22 °C, 5 to 10 % at 25 °C, 1 to 5 % at 30 °C.
60 °C (140 °F): yeast and bacteria die. The flour’s own enzymes keep working until about 70 °C (158 °F).
92 °C (197 °F): your bread is done. The crumb never gets hotter than about 100 °C (212 °F) while it still holds water.
105 to 120 °C (221 to 248 °F): browning starts, but only where the crust has dried out. Sugars caramelize from about 170 °C (338 °F).
118 °C (244 °F): acetic acid boils. It leaves with the steam long before that, mostly from the crust, while lactic acid stays. A longer bake gives a milder loaf.
The thermometer
You are welcome to share it. A tag or a link back to this page is appreciated.
Tap the image for the full size version.
All 12 temperatures at a glance
Temperature
What happens
What it means for you
230 °C (446 °F)
Your oven
A typical baking temperature for a sourdough loaf.
170 °C (338 °F)
Sugars caramelize
The crust keeps darkening. Bake to the color you like.
120 °C (248 °F)
Maillard browning starts
Only once the surface has dried out, from about 105 °C.
118 °C (244 °F)
Acetic acid boils
Only the crust gets this hot. The acid leaves earlier with the steam.
100 °C (212 °F)
Water boils
The highest temperature your crumb reaches.
92 °C (197 °F)
Done
Measure the core with a probe thermometer.
70 °C (158 °F)
Flour amylases stop
The flour’s enzymes make sugar until here.
60 °C (140 °F)
Yeast and bacteria die
Fermentation ends.
30 °C (86 °F)
Use 1-5 % starter
Otherwise bulk fermentation is over in 2 to 4 hours.
25 °C (77 °F)
Use 5-10 % starter
Less starter keeps the timing manageable.
22 °C (72 °F)
Use 20 % starter
Bulk fermentation takes about 10 hours.
4 °C (40 °F)
Fermentation pauses
The dough can wait up to 24 hours.
In the dough: 4 to 30 °C
4 °C: fermentation pauses
At fridge temperature, yeast and bacteria slow down so much that your dough
barely changes. That is what makes cold retarding work: shape in the evening,
bake in the morning. Your dough can wait for up to 24 hours.
22 to 30 °C: temperature and starter amount are one dial
The same dough ferments much faster in a warm kitchen. At 22 °C (72 °F), 20 %
starter gives you a bulk fermentation of about 10 hours. At 25 °C (77 °F), cut
the starter to 5 to 10 %. At 30 °C (86 °F), use just 1 to 5 %, or the bulk is
over in 2 to 4 hours.
That is why copying the schedule of a recipe rarely works. Adjust the starter
amount to your temperature, and the schedule follows. The
wheat sourdough chapter
of my book has a table for starter amounts by temperature.
In the oven: 60 to 230 °C
60 °C: yeast and bacteria die
Around 60 °C (140 °F) the yeast and bacteria in your dough die, and
fermentation ends.
70 °C: the flour’s enzymes stop
The yeast is dead, but your flour is still working. Wheat amylases, the
enzymes that turn starch into sugar, stay stable up to about 70 °C (158 °F)
and are inactivated as the dough heats up further (Singh et al. 2015,
Innograin 2023). For a few minutes the enzymes keep making sugar that no
yeast eats anymore.
92 °C: your bread is done
Use a probe thermometer in the center of the loaf. At a core temperature of
about 92 °C (197 °F) the crumb has set and the bread is baked. From here on you
are mostly baking the crust.
Why the crumb never gets past 100 °C
As long as the crumb holds water, it cannot get hotter than the boiling point
of water. In one measurement in a 230 °C oven, the crumb peaked at 97 °C
(Reichenberger et al. 2020). Baking studies show the same picture: the crumb
stays at or below 100 °C with an almost constant water content, while only
the crust dries out and heats up (Purlis 2010).
Browning starts on a dry crust
Browning only starts where the surface has dried out. Once the crust passes
about 105 to 120 °C (221 to 248 °F), the Maillard reaction between sugars and
proteins sets in, and it speeds up the hotter the crust gets (Purlis 2010).
From about 170 °C (338 °F) the remaining sugars caramelize.
This is also why steam matters at the start of the bake. A wet surface cannot
dry out, so it stays soft and stretchy for oven spring instead of browning
too early.
Where the sour taste goes
Acetic acid, the sharp, vinegar-like part of the sourness, boils at 118 °C
(244 °F). But it does not wait for that temperature. It is volatile and
leaves your dough together with the water vapor, mostly from the drying
crust. Lactic acid, the mild part, barely evaporates at all. The 122 °C
boiling point you sometimes read for lactic acid is measured under a strong
vacuum (PubChem).
Wine labs use exactly this difference. When they separate the acids of a wine
with steam, the steam carries over at least 99.5 % of the acetic acid, but no
more than 0.5 % of the lactic acid (OIV). Measurements of baked sourdough
bread also find less acid in the crust than in the crumb
(Vriesekoop et al. 2021).
What this means for your bread:
A longer, darker bake gives a milder loaf. More water leaves, and the acetic acid leaves with it.
For more tang, bake shorter and keep the crust lighter.
The crumb keeps most of its acids, because it never gets past 100 °C and keeps its water.
For the coders
If you think in code, here is the same scale as a program.
// sourdough_thermometer.js
if (temp <= 4) fermentation.pause();
if (temp == 22) starter = '20 %';
if (temp == 25) starter = '5-10 %';
if (temp >= 30) starter = '1-5 %';
if (temp >= 60) yeast.die(); bacteria.die();
if (temp >= 70) amylase.stop();
if (core >= 92) bread.done = true;
if (temp >= 100) water.evaporate();
if (crust >= 118) aceticAcid.boil();
// the crumb stays below 100 °C: more tang
if (crust >= 120) crust.maillard();
if (temp >= 170) sugars.caramelize();
oven.preheat(230);
Sources
The fermentation numbers come from my free book
The Sourdough Framework. The
chemistry is checked against these sources:
Kleinwächter, H. The Sourdough Framework, chapters Baking and Wheat sourdough.
NIST Chemistry WebBook: Acetic acid, boiling point 118 °C.
PubChem: Lactic acid, boiling point 122 °C at 15 mm Hg, citing the CRC Handbook of Chemistry and Physics.
International Organisation of Vine and Wine: Volatile acidity, method OIV-MA-AS313-02 (2015).
Purlis, E. (2010). Browning development in bakery products, a review. Journal of Food Engineering 99: 239-249. doi:10.1016/j.jfoodeng.2010.03.008
Reichenberger, K. et al. (2020). Determination of the direct activity of the maltogenic amylase from Geobacillus stearothermophilus in white bread. Food Analytical Methods 13: 496-502. doi:10.1007/s12161-019-01673-7
Singh, K. et al. (2015). Heat, acid and chemically induced unfolding pathways, conformational stability and structure-function relationship in wheat alpha-amylase. PLOS ONE 10(6): e0129203. doi:10.1371/journal.pone.0129203
Innograin, Universidad de Valladolid (2023). Enzymes I.
Vriesekoop, F. et al. (2021). Incorporation of fermented brewers spent grain in the production of sourdough bread. Fermentation 7(2): 96. doi:10.3390/fermentation7020096
Keep reading
The best way to bake bread in your oven: oven spring without a Dutch oven.
The last sourdough recipe: the bread I bake every week.
Debugging your crumb: what the crumb tells you about fermentation.
https://www.the-bread-code.io/tutorial/2026/10/09/sourdough-thermometer.html
Welcome to BreadLab spacestr profile!
About Me
Sourdough, fermentation, and tasty kitchen experiments. Unofficial automated fan feed. Content belongs to its respective owners; not affiliated with source publishers.